เลือกตำแหน่งที่ตั้งของคุณ
โปรดเลือกตำแหน่งที่ตั้งและภาษาของคุณเพื่อรับประสบการณ์เว็บไซต์ที่ดีที่สุด

Are you spending too much time designing label templates with multiple rows of data, repeating fields, or manually formatting content that changes with every print job? CODESOFT’s GridField feature is exactly what you need.
GridField is a powerful way to structure your label data, helping you reduce errors, save time, and scale your labeling operations. Whether you're creating case labels, shipping lists, or product documentation, GridField helps you manage multiple rows of data within a single object.
In this blog, learn how to create a label using GridField in CODESOFT label design software, step by step.
GridField is a dynamic object in CODESOFT Enterprise that allows you to display and structure multi-line, table-like data on your label—automatically pulled from a database or spreadsheet.
Instead of manually laying out multiple fields for each line item, GridField becomes a single object that displays an entire list. You can think of it like embedding a mini spreadsheet on your label. It supports both constant and variable data, making it ideal for creating reusable templates across high-volume labeling environments.
GridField simplifies the complex process of creating labels with structured data. Below are some other ways GridField helps with labeling:
The most common use cases for GridField are labels and documents that display multiple database records on one label, such as:
GridField is a feature that is used in many different industries, including:
Entertainment Earth is an online retailer and wholesaler of licensed collectibles, including action figures, clothing, statues, prop replicas, games, vinyl figures, dolls, and toys. While using their newly implemented SENTINEL and CODESOFT labeling software, they leveraged GridField which allowed them to easily and efficiently design and print work orders. Entertainment Earth used GridField when shipping Amazon packages. When order data is received, GridField organizes the details and pricing for all items within the order into a neat and efficient grid on the work order. Read the full case study.
There are two ways to create the table lookup that pulls the data onto the label.
In the next section you’ll learn how to create a label using GridField with the second method: pulling all records from the database or table onto the label.
If the data on your label will be queried from a database connection, without using a Key Field, you must create your Table Lookup the following way.
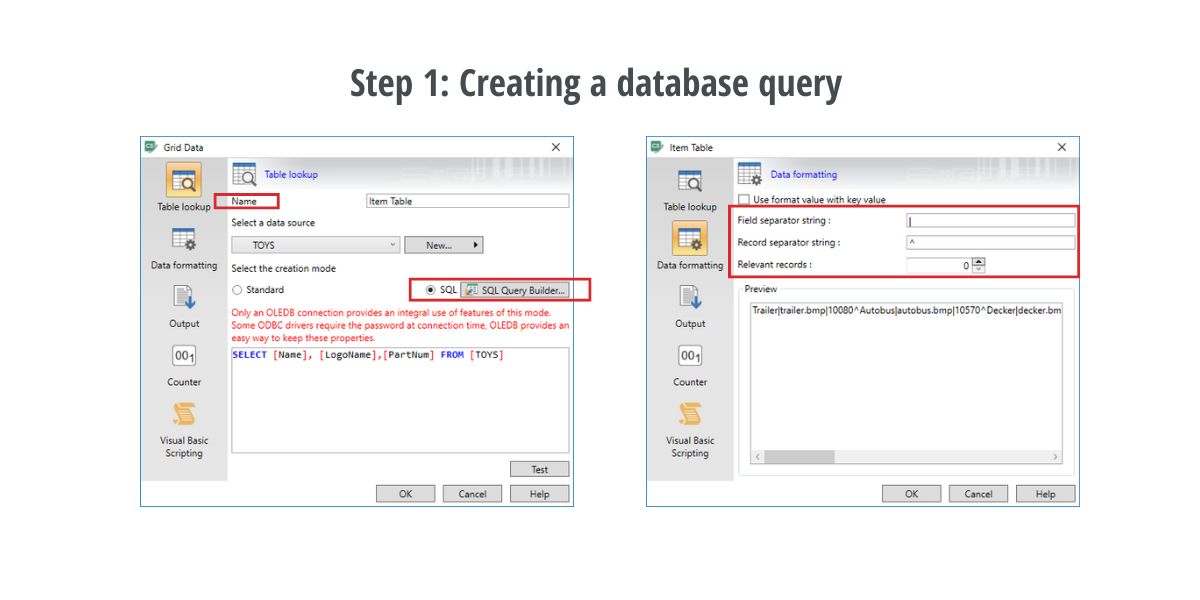
Above shows how to create a database query in CODESOFT label design software.
Once you have placed your GridField object on the label template, it will automatically open the Properties window for you to alter the properties to your specifications. You can also open the Properties window by right-clicking on the GridField object and selecting Properties.
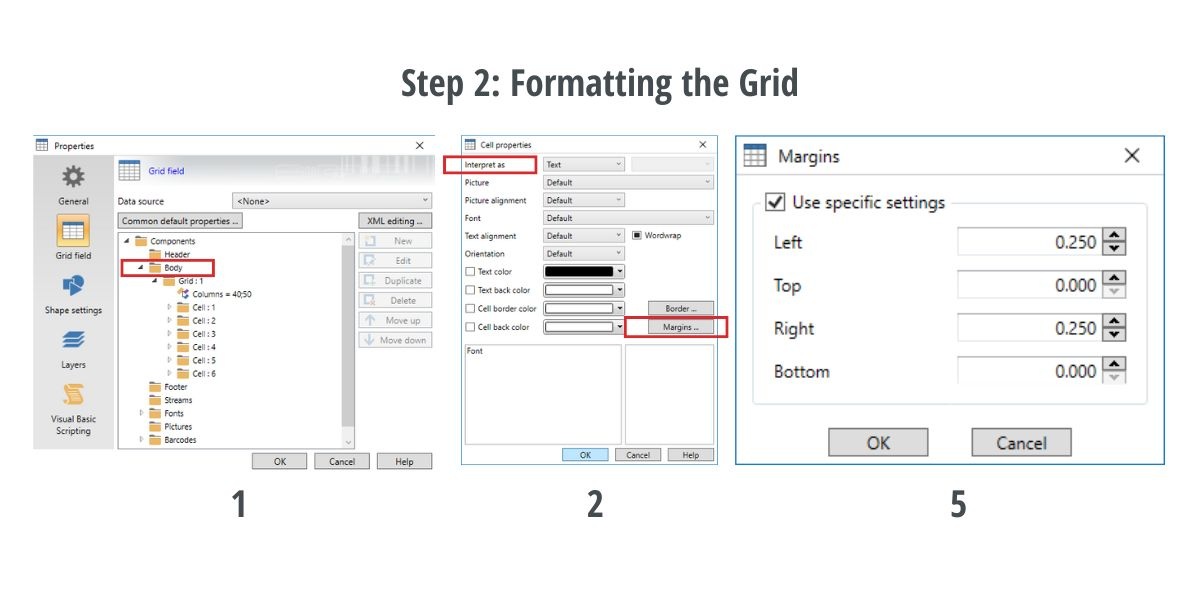
The screenshots above show points 1,2, and 5 of formatting grids within CODESOFT label design software.
Once you've completed all the steps above your label will look like the image below.

GridField is a powerful feature in CODESOFT that offers many options for configuring label templates. To help you get started, we’ve created a label sample that demonstrates how to use GridField to build complex labels in CODESOFT.
Have questions or need assistance? Our labeling experts are here to help. Our award-winning customer support team is always ready to assist with your labeling needs. We also provide professional services and custom label creation to support your design and setup.
Whether your business uses GridField for purchase orders, pick lists, or displaying multiple database records on a single label, CODESOFT can help streamline your labeling process. Download a free 30-day trial today to start exploring GridField.
Shawn Frahman is the Product Specialist at TEKLYNX. He has a passion for troubleshooting and developing solutions that help customers better understand and use their software. He plays a key role in shaping the customer support team as the primary trainer for new support representatives. Outside of work, Shawn enjoys participating in bowling and ping pong leagues.
If you print labels with variable information, that same variable information is likely what’s also used on pick lists, pack lists, bills of material, and purchase orders. Leveraging your label design software to print corresponding documents saves time and money, improves the integrity of your data across labels and documents, and maximizes the return on investment (ROI) for software you already invested in.
READ MORE
Picture a world where your label data is always 100% right, cutting down on waste and making life easier for users. For many businesses—especially those in manufacturing, food and beverage, and other industries—that need precise labeling, this may seem impossible. But the answer is simple: having a single source of truth (SSOT) for label data.
READ MORE
When you need to print a label, how long does it take to find the correct file, populate the correct data, and start the print job? If you’re not leveraging the power of variable data on smart label templates, it could take several minutes just to find the right label file!
READ MORE© Copyright 2025 TEKLYNX CORPORATION SAS. สงวนลิขสิทธิ์
What do you think? Leave us a comment.
Comments will be reviewed and are subject to TEKLYNX’ comment policy. Your email address will not be published publicly.